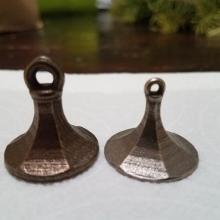
Seal matrices were common in Europe (and the Middle East, but this demonstration only deals with European matrices) from the 9th Century on. Multiple examples may be found in the collections of many museums. I relied particularly upon the examples in the British Museum and the Portable Antiquities Scheme.
This presentation is particularly focused on using modern tools to make tools/blanks for further use. In this case, while presentation is focused upon making a seal matrix, the ultimate goal of this project is to make a wax seal using the tool we've made.
-GIMP, a free graphic editing tool was used to edit analog images and help convert them to digital images.
-Inkscape, a free graphic editing tool was used to convert raster graphic images into vector graphic images for conversion to 3D objects.
-TinkerCAD, a free, browser-based 3D modelling tool was used to create the 3D images that were sent to the manufacturer.
-Shapeways, a 3D manufacturer produced the tools/blanks based on the files provided.
-Google Slides, a free, online presentation tool was used to create the presentation.
-Facebook Live, was used to present the information to the widest possible audience
This project was unintentional. I *wanted* to make a wax seal to put on the exterior shipping container of my playing cards. I wanted it to be vaguely late 14th Century in style. So I researched late 14th Century seals and seal matrices by searching the online collections of the French National Library, the British Museum, the Metropolitan Museum of Art, Kunera, and the Portable Antiquities Scheme. I became entranced by the physical forms of the seal matrices and began experimenting with creating them. The advantage of 3D modelling and additive manufacturing (3D printing) is that you can fail very quickly at a fairly low cost.
I was able to take advantage of previous failures in the production of buttons, molds, pilgrim badges, and belt fittings to rapidly advance my progress.
The basic form of the matrix was selected from several examples and reduced to the simplest elements. The round base was chosen because it was the easiest to work with, a handle was chosen because it was a visually appealing element, and the handle elements were reduced to their most basic components.
The basic matrix form was created in TinkerCAD. The seal face was created by hand-drawing the design and then creating it in Inkscape. The Inkscape object was transferred to TinkerCAD (as demonstrated in the video) and used to engrave the face of the matrix. The matrix was transferred to Shapeways for printing. I chose to print in metal (steel) rather than plastic because I already knew how well plastic worked and I was curious about how strong the steel would be.
The first production was a failure. The matrix printed successfully but my inattention to proportion made the piece useless. I returned to my research and paid careful attention to measurements and proportions and recreated the seal, this time incorporating a more complex heraldry. The second production was successful and sent on to the gentleman who had acted as my patron in this matter.
The details of the project were assembled into a presentation in Google Slides and presented via Facebook Live.
The point of this entire project was to demonstrate how tools or blanks to produce finished projects might be produced. If the seal is the finished product then the matrix is just a tool we use to create the seal. If we wanted a finished seal we might use this technique to produce a metal blank that could be hand-finished. Or we might print a wax blank that could be hand-finished and engraved and used in a lost wax casting. Or we might produce a high-quality, finished plastic blank that could also be used in a lost wax-like casting process.
Video presentation visible at: https://www.facebook.com/VariantofNormal/videos/351060769144983/

